<?xml version="1.0" encoding="utf-8"?><feed xmlns="http://www.w3.org/2005/Atom" ><generator uri="https://jekyllrb.com/" version="3.10.0">Jekyll</generator><link href="https://andi.sg/feed.xml" rel="self" type="application/atom+xml" /><link href="https://andi.sg/" rel="alternate" type="text/html" /><updated>2026-08-03T06:27:51+00:00</updated><id>https://andi.sg/feed.xml</id><title type="html">andi.sg</title><subtitle>Living live and make it better</subtitle><author><name>Andi</name></author><entry><title type="html">Mobile Monitoring with New Relic: Flutter Integration</title><link href="https://andi.sg/mobile-monitoring-with-new-relic-flutter-integration/" rel="alternate" type="text/html" title="Mobile Monitoring with New Relic: Flutter Integration" /><published>2025-03-14T00:00:00+00:00</published><updated>2025-03-14T00:00:00+00:00</updated><id>https://andi.sg/mobile-monitoring-with-new-relic-flutter-integration</id><content type="html" xml:base="https://andi.sg/mobile-monitoring-with-new-relic-flutter-integration/"><![CDATA[<p>In the fast-paced world of mobile app development, ensuring performance and reliability is paramount. Integrating monitoring tools such as New Relic not only helps in keeping track of your application’s health but also optimizes the user experience. In this article, we’ll walk through integrating New Relic into a Flutter application backed by a Python server and see how to monitor it using New Relic One.</p>

<h2 id="clone-the-repository">Clone the Repository</h2>

<p>The first step to getting started is to clone the source repositories, which include both the Flutter application and the Python backend. Open your terminal and execute the following command:</p>

<div class="language-bash highlighter-rouge"><div class="highlight"><pre class="highlight"><code>git clone https://github.com/andibaso/todoist-flutter.git
git clone https://github.com/andibaso/todoist-python.git
</code></pre></div></div>

<h2 id="step-2-run-the-application">Step 2: Run the Application</h2>

<p>With the repositories cloned, navigate into your Flutter project’s directory and set up the environment. Ensure you have both Flutter and Dart installed on your machine. Enter the following commands:</p>

<div class="language-bash highlighter-rouge"><div class="highlight"><pre class="highlight"><code><span class="nb">cd </span>todoist-flutter
flutter pub get
flutter run
</code></pre></div></div>

<p>Additionally, start your Python backend as follows:</p>

<div class="language-bash highlighter-rouge"><div class="highlight"><pre class="highlight"><code><span class="nb">cd</span> ../todoist-python
pip <span class="nb">install</span> <span class="nt">-r</span> requirements.txt
python manage.py runserver
</code></pre></div></div>

<p>Make sure that all the necessary packages are installed both for Flutter and Python to ensure seamless interaction between the mobile app and its backend.</p>

<h2 id="add-new-relic-integration-into-mobile">Add New Relic Integration into Mobile</h2>

<p>Now that your application is up and running, it’s time to integrate New Relic for monitoring. New Relic allows you to gain insights into your application’s performance by offering various metrics and visualizations.</p>

<ol>
  <li>
    <p><strong>Sign Up/In at New Relic</strong>: If you haven’t already, create an account at <a href="https://newrelic.com/">New Relic</a>.</p>
  </li>
  <li>
    <p><strong>Generate API Keys</strong>: Navigate to ‘Account Settings’ and generate your API key needed for integration.</p>
  </li>
  <li>
    <p><strong>Install New Relic Mobile Monitoring Library</strong>: Add the New Relic Flutter package to your <code class="language-plaintext highlighter-rouge">pubspec.yaml</code> in your Flutter project:</p>
  </li>
</ol>

<div class="language-yaml highlighter-rouge"><div class="highlight"><pre class="highlight"><code>  <span class="na">dependencies</span><span class="pi">:</span>
    <span class="na">newrelic_flutter_agent</span><span class="pi">:</span> <span class="s">^1.0.0</span>
</code></pre></div></div>

<p>Run <code class="language-plaintext highlighter-rouge">flutter pub get</code> to install the package.</p>

<ol>
  <li><strong>Modify Main Entry Point</strong>: Edit your <code class="language-plaintext highlighter-rouge">main.dart</code> entry point to initialize New Relic:</li>
</ol>

<div class="language-dart highlighter-rouge"><div class="highlight"><pre class="highlight"><code>  <span class="kn">import</span> <span class="s">'package:flutter/material.dart'</span><span class="o">;</span>
  <span class="kn">import</span> <span class="s">'package:newrelic_flutter_agent/newrelic_flutter_agent.dart'</span><span class="o">;</span>
  
  <span class="kt">void</span> <span class="n">main</span><span class="p">()</span> <span class="p">{</span>
    <span class="n">NewRelic</span><span class="o">.</span><span class="na">init</span><span class="p">(</span><span class="s">'&lt;your-api-key&gt;'</span><span class="p">);</span>
    <span class="n">runApp</span><span class="p">(</span><span class="n">MyApp</span><span class="p">());</span>
  <span class="p">}</span>
</code></pre></div></div>

<p>Replace <code class="language-plaintext highlighter-rouge">&lt;your-api-key&gt;</code> with your actual New Relic API Key.</p>

<ol>
  <li><strong>Add Custom Metrics and Events</strong>: Utilize the New Relic API to record custom events, errors, and performance metrics throughout the application lifecycle as needed.</li>
</ol>

<h2 id="step-4-monitoring-result-with-new-relic-one">Step 4: Monitoring Result with New Relic One</h2>

<p>With the integration complete, it’s time to start monitoring your application performance using New Relic One:</p>

<ol>
  <li>
    <p><strong>Access New Relic One Dashboard</strong>: Navigate to the New Relic One dashboard and locate your application.</p>
  </li>
  <li>
    <p><strong>Observe Real-time Metrics</strong>: Analyze metrics such as app load time, error rates, throughput, and memory usage which will be visible within the dashboard.</p>
  </li>
  <li>
    <p><strong>Set Up Alerts</strong>: Configure alerts to notify you of critical conditions or thresholds, ensuring proactive management of your app’s health.</p>
  </li>
  <li>
    <p><strong>Explore Reports and Insights</strong>: Dive into detailed reports and explore various insights to optimize the performance and reliability of your Flutter application.</p>
  </li>
</ol>

<p>The integration of New Relic provides invaluable data points that contribute to better decision-making concerning optimizations and user experience improvements.</p>

<hr />

<p>Mobile monitoring is crucial and New Relic offers a robust solution to get clarity on app performance straight to your fingertips. By following these steps, you can enhance your monitoring setup quickly and efficiently, ensuring that your users receive the best possible experience!</p>]]></content><author><name>Andi</name></author><category term="New Relic" /><category term="Tutorial" /><category term="featured" /><summary type="html"><![CDATA[In the fast-paced world of mobile app development, ensuring performance and reliability is paramount. Integrating monitoring tools such as New Relic not only helps in keeping track of your application’s health but also optimizes the user experience. In this article, we’ll walk through integrating New Relic into a Flutter application backed by a Python server and see how to monitor it using New Relic One.]]></summary><media:thumbnail xmlns:media="http://search.yahoo.com/mrss/" url="https://andi.sg/assets/images/demo1.jpg" /><media:content medium="image" url="https://andi.sg/assets/images/demo1.jpg" xmlns:media="http://search.yahoo.com/mrss/" /></entry><entry><title type="html">Complete Guide to Network Simulation and Monitoring with New Relic</title><link href="https://andi.sg/complete-guide-to-network-monitoring-in-new-relic/" rel="alternate" type="text/html" title="Complete Guide to Network Simulation and Monitoring with New Relic" /><published>2025-03-01T00:00:00+00:00</published><updated>2025-03-01T00:00:00+00:00</updated><id>https://andi.sg/complete-guide-to-network-monitoring-in-new-relic</id><content type="html" xml:base="https://andi.sg/complete-guide-to-network-monitoring-in-new-relic/"><![CDATA[<p>This guide provides a comprehensive step-by-step setup for monitoring network data using New Relic, leveraging Docker containers and simulation tools. It outlines the configuration process for SNMP and network flow monitoring, ensuring a robust framework for data analysis and infrastructure management.</p>

<h3 id="configure-your-new-relic-license-and-user-key">Configure Your New Relic License and User Key</h3>

<p>To initiate monitoring with New Relic, commence by setting up your account credentials. Execute the following commands to export your account ID, license key, region, and user key:</p>

<div class="language-bash highlighter-rouge"><div class="highlight"><pre class="highlight"><code><span class="nb">export </span><span class="nv">NR_ACCOUNT_ID</span><span class="o">=</span>XXXXXXX
<span class="nb">export </span><span class="nv">NR_LICENSE_KEY</span><span class="o">=</span>XXXXXXXXXXXXXXXXXXXXXXXXXXXXXXXXFFFFNRAL
<span class="nb">export </span><span class="nv">NR_REGION</span><span class="o">=</span>US
<span class="nb">export </span><span class="nv">NR_USER_KEY</span><span class="o">=</span>XXXX-XXXXXXXXXXXXXXXXXXXXXXXXXXX
</code></pre></div></div>

<hr />

<h2 id="device-monitoring">Device Monitoring</h2>

<p><strong>Step 1: Install Docker Dependencies</strong></p>

<p>Begin by installing Docker dependencies needed for network monitoring. Add Docker’s official GPG key and set up the repository with these commands:</p>

<div class="language-bash highlighter-rouge"><div class="highlight"><pre class="highlight"><code><span class="c"># Add Docker's official GPG key:</span>
<span class="nb">sudo </span>apt-get update
<span class="nb">sudo </span>apt-get <span class="nb">install </span>ca-certificates curl
<span class="nb">sudo install</span> <span class="nt">-m</span> 0755 <span class="nt">-d</span> /etc/apt/keyrings
<span class="nb">sudo </span>curl <span class="nt">-fsSL</span> https://download.docker.com/linux/debian/gpg <span class="nt">-o</span> /etc/apt/keyrings/docker.asc
<span class="nb">sudo chmod </span>a+r /etc/apt/keyrings/docker.asc

<span class="c"># Add the repository to Apt sources:</span>
<span class="nb">echo</span> <span class="se">\</span>
  <span class="s2">"deb [arch=</span><span class="si">$(</span>dpkg <span class="nt">--print-architecture</span><span class="si">)</span><span class="s2"> signed-by=/etc/apt/keyrings/docker.asc] https://download.docker.com/linux/debian </span><span class="se">\</span><span class="s2">
  </span><span class="si">$(</span><span class="nb">.</span> /etc/os-release <span class="o">&amp;&amp;</span> <span class="nb">echo</span> <span class="s2">"</span><span class="nv">$VERSION_CODENAME</span><span class="s2">"</span><span class="si">)</span><span class="s2"> stable"</span> | <span class="se">\</span>
  <span class="nb">sudo tee</span> /etc/apt/sources.list.d/docker.list <span class="o">&gt;</span> /dev/null
<span class="nb">sudo </span>apt-get update

<span class="nb">sudo </span>apt-get <span class="nb">install </span>docker-ce docker-ce-cli containerd.io docker-buildx-plugin docker-compose-plugin
</code></pre></div></div>

<p><strong>Step 2: Install jq</strong></p>

<p><code class="language-plaintext highlighter-rouge">jq</code> is a lightweight and flexible command-line JSON processor. Install it using:</p>

<div class="language-bash highlighter-rouge"><div class="highlight"><pre class="highlight"><code><span class="nb">sudo echo</span> <span class="s2">"deb http://us.archive.ubuntu.com/ubuntu vivid main universe"</span> <span class="o">&gt;&gt;</span> /etc/apt/sources.list
<span class="nb">sudo </span>apt-get update
<span class="nb">sudo </span>apt-get <span class="nb">install </span>jq <span class="nt">-y</span>
</code></pre></div></div>

<p><strong>Step 3: Configure Docker</strong></p>

<p>Adjust your Docker settings for optimal performance:</p>

<div class="language-bash highlighter-rouge"><div class="highlight"><pre class="highlight"><code><span class="nb">sudo </span>usermod <span class="nt">-aG</span> docker <span class="nv">$USER</span>
<span class="nb">sudo </span>systemctl start docker
<span class="nb">sudo chmod </span>666 /var/run/docker.sock
docker swarm init
</code></pre></div></div>

<p><strong>Step 4: Create Docker Network</strong></p>

<p>Create a Docker network to simulate devices and connect them effortlessly:</p>

<div class="language-bash highlighter-rouge"><div class="highlight"><pre class="highlight"><code>docker network create <span class="nt">-d</span> overlay <span class="nt">--subnet</span><span class="o">=</span>10.10.0.0/24 <span class="nt">--attachable</span> testnet
</code></pre></div></div>

<p><strong>Step 5: Simulate Devices</strong></p>

<p>Use Docker containers to simulate three network devices. Download and run preconfigured images using the following commands:</p>

<div class="language-bash highlighter-rouge"><div class="highlight"><pre class="highlight"><code>docker run <span class="nt">-d</span> <span class="nt">--name</span><span class="o">=</span>cisco-router <span class="nt">--restart</span><span class="o">=</span>always <span class="nt">--network</span><span class="o">=</span>testnet <span class="nt">--privileged</span> <span class="nt">-v</span> /:/rootfs:ro <span class="nt">-v</span> /etc/localtime:/etc/localtime:ro <span class="nt">-v</span> ./files/cisco-router:/usr/local/snmpsim/data tandrup/snmpsim
docker run <span class="nt">-d</span> <span class="nt">--name</span><span class="o">=</span>cisco-switch <span class="nt">--restart</span><span class="o">=</span>always <span class="nt">--network</span><span class="o">=</span>testnet <span class="nt">--privileged</span> <span class="nt">-v</span> /:/rootfs:ro <span class="nt">-v</span> /etc/localtime:/etc/localtime:ro <span class="nt">-v</span> ./files/cisco-switch:/usr/local/snmpsim/data tandrup/snmpsim
docker run <span class="nt">-d</span> <span class="nt">--name</span><span class="o">=</span>linksys-router <span class="nt">--restart</span><span class="o">=</span>always <span class="nt">--network</span><span class="o">=</span>testnet <span class="nt">--privileged</span> <span class="nt">-v</span> /:/rootfs:ro <span class="nt">-v</span> /etc/localtime:/etc/localtime:ro <span class="nt">-v</span> ./files/linksys-router:/usr/local/snmpsim/data tandrup/snmpsim
</code></pre></div></div>

<p><strong>Step 6: Inspect Your Created Network</strong></p>

<p>Verify the configuration of your Docker network:</p>

<div class="language-bash highlighter-rouge"><div class="highlight"><pre class="highlight"><code>docker network inspect testnet
</code></pre></div></div>

<p><strong>Step 7: Create SNMP Base Configuration</strong></p>

<p>Utilize the <code class="language-plaintext highlighter-rouge">ktranslate</code> Docker image to set up your initial SNMP base configuration:</p>

<div class="language-bash highlighter-rouge"><div class="highlight"><pre class="highlight"><code>docker pull kentik/ktranslate:v2
<span class="nb">id</span><span class="o">=</span><span class="si">$(</span>docker create kentik/ktranslate:v2<span class="si">)</span>
docker <span class="nb">cp</span> <span class="nv">$id</span>:/etc/ktranslate/snmp-base.yaml <span class="nb">.</span>
docker <span class="nb">rm</span> <span class="nt">-v</span> <span class="nv">$id</span>
<span class="nb">chmod </span>646 snmp-base.yaml
</code></pre></div></div>

<p><strong>Step 8: Inspect the Base Configuration</strong></p>

<p>Check the configuration file to ensure it meets your requirements:</p>

<div class="language-bash highlighter-rouge"><div class="highlight"><pre class="highlight"><code>vi snmp-base.yml
</code></pre></div></div>

<p><strong>Step 9: Run Discovery Profile</strong></p>

<p>Initiate a discovery operation in your network:</p>

<div class="language-bash highlighter-rouge"><div class="highlight"><pre class="highlight"><code>docker run <span class="nt">-ti</span> <span class="nt">--name</span> ktranslate-discovery <span class="nt">--rm</span> <span class="nt">--net</span><span class="o">=</span>testnet <span class="se">\</span>
  <span class="nt">--user</span> <span class="sb">`</span><span class="nb">id</span> <span class="nt">-u</span><span class="sb">`</span>:<span class="sb">`</span><span class="nb">id</span> <span class="nt">-g</span><span class="sb">`</span> <span class="se">\</span>
  <span class="nt">-v</span> <span class="sb">`</span><span class="nb">pwd</span><span class="sb">`</span>/snmp-base.yaml:/snmp-base.yaml <span class="se">\</span>
  kentik/ktranslate:v2 <span class="se">\</span>
  <span class="nt">-snmp</span> /snmp-base.yaml <span class="se">\</span>
  <span class="nt">-log_level</span> info <span class="se">\</span>
  <span class="nt">-snmp_discovery</span><span class="o">=</span><span class="nb">true</span>
</code></pre></div></div>

<p>S<strong>Step 10: Running the ktranslate Agent</strong>*</p>

<p>Now it’s time to run the ktranslate agent to collect and send SNMP data to New Relic. Use the following command, which configures various parameters such as compression, logging, and data formatting:</p>

<div class="language-bash highlighter-rouge"><div class="highlight"><pre class="highlight"><code>docker run <span class="nt">-d</span> <span class="nt">--name</span> ksnmp <span class="nt">--restart</span> unless-stopped <span class="nt">--net</span><span class="o">=</span>testnet <span class="se">\</span>
  <span class="nt">-v</span> <span class="sb">`</span><span class="nb">pwd</span><span class="sb">`</span>/snmp-base.yaml:/snmp-base.yaml <span class="se">\</span>
  <span class="nt">-e</span> <span class="nv">NEW_RELIC_API_KEY</span><span class="o">=</span><span class="nv">$NR_LICENSE_KEY</span> <span class="se">\</span>
  kentik/ktranslate:v2 <span class="se">\</span>
    <span class="nt">-snmp</span> /snmp-base.yaml <span class="se">\</span>
    <span class="nt">-compression</span><span class="o">=</span><span class="nb">gzip</span> <span class="se">\</span>
    <span class="nt">-sinks</span><span class="o">=</span>new_relic <span class="se">\</span>
    <span class="nt">-nr_account_id</span><span class="o">=</span><span class="nv">$NR_ACCOUNT_ID</span> <span class="se">\</span>
    <span class="nt">-log_level</span><span class="o">=</span>info <span class="se">\</span>
    <span class="nt">-metrics</span><span class="o">=</span>jchf <span class="se">\</span>
    <span class="nt">-tee_logs</span><span class="o">=</span><span class="nb">true</span> <span class="se">\</span>
    <span class="nt">-max_flows_per_message</span><span class="o">=</span>100 <span class="se">\</span>
    <span class="nt">-listen</span><span class="o">=</span>0.0.0.0:8183 <span class="se">\</span>
    <span class="nt">-metalisten</span><span class="o">=</span>0.0.0.0:8184 <span class="se">\</span>
    <span class="nt">-format</span><span class="o">=</span>new_relic_metric <span class="se">\</span>
    <span class="nt">-nr_region</span><span class="o">=</span><span class="nv">$NR_REGION</span> <span class="se">\</span>
    <span class="nt">-service_name</span><span class="o">=</span>ksnmp
</code></pre></div></div>

<p>**Step 11 : Inspect the logs to ensure that everything is functioning correctly: **</p>

<div class="language-bash highlighter-rouge"><div class="highlight"><pre class="highlight"><code>docker container logs ksnmp <span class="nt">-f</span>
</code></pre></div></div>

<h3 id="network-flow-monitoring">Network Flow Monitoring</h3>

<p>**Step 1: Install ktranslate agent **
To set up network flow monitoring, run another ktranslate container specifically configured for handling network flow data:</p>

<div class="language-bash highlighter-rouge"><div class="highlight"><pre class="highlight"><code>docker run <span class="nt">-d</span> <span class="nt">--name</span> knetflow <span class="nt">--restart</span> unless-stopped <span class="nt">--net</span><span class="o">=</span>testnet <span class="se">\</span>
  <span class="nt">-v</span> <span class="sb">`</span><span class="nb">pwd</span><span class="sb">`</span>/snmp-base.yaml:/snmp-base.yaml <span class="se">\</span>
  <span class="nt">-e</span> <span class="nv">NEW_RELIC_API_KEY</span><span class="o">=</span><span class="nv">$NR_LICENSE_KEY</span> <span class="se">\</span>
  kentik/ktranslate:v2 <span class="se">\</span>
    <span class="nt">-snmp</span> /snmp-base.yaml <span class="se">\</span>
    <span class="nt">-nr_account_id</span><span class="o">=</span><span class="nv">$NR_ACCOUNT_ID</span> <span class="se">\</span>
    <span class="nt">-metrics</span><span class="o">=</span>jchf <span class="se">\</span>
    <span class="nt">-log_level</span><span class="o">=</span>debug <span class="se">\</span>
    <span class="nt">-tee_logs</span><span class="o">=</span><span class="nb">true</span> <span class="se">\</span>
    <span class="nt">-flow_only</span><span class="o">=</span><span class="nb">true</span> <span class="se">\</span>
    <span class="nt">-nf</span>.source<span class="o">=</span>netflow5 <span class="se">\</span>
    <span class="nt">-listen</span><span class="o">=</span>0.0.0.0:8283 <span class="se">\</span>
    <span class="nt">-metalisten</span><span class="o">=</span>0.0.0.0:8284 <span class="se">\</span>
    <span class="nt">-nr_region</span><span class="o">=</span><span class="nv">$NR_REGION</span> <span class="se">\</span>
    nr1.flow
</code></pre></div></div>

<p><strong>Step 2: Inspect your network and find your flow monitoring agent address</strong></p>

<p>Take a moment to inspect your Docker network setup again:</p>

<div class="language-bash highlighter-rouge"><div class="highlight"><pre class="highlight"><code>docker network inspect testnet
</code></pre></div></div>

<p><strong>Step 3: Simulate Network Flow</strong></p>

<p>Launch a network flow simulation device using the following command, which generates NetFlow data for testing purposes:</p>

<div class="language-bash highlighter-rouge"><div class="highlight"><pre class="highlight"><code>docker run <span class="nt">-d</span> <span class="nt">--name</span><span class="o">=</span>flow-device <span class="nt">--restart</span><span class="o">=</span>always <span class="nt">--network</span><span class="o">=</span>testnet <span class="nt">--privileged</span> networkstatic/nflow-generator <span class="nt">-t</span> 10.10.0.8 <span class="nt">-p</span> 9995
</code></pre></div></div>

<p><strong>Step 4: Inspect the netflow logs to verify data collection and processing:</strong></p>

<div class="language-bash highlighter-rouge"><div class="highlight"><pre class="highlight"><code>docker container logs knetflow <span class="nt">-f</span>
</code></pre></div></div>

<p>By following these steps, you will have successfully set up a comprehensive network monitoring solution using New Relic. Monitor both SNMP and network flow data effectively, ensuring optimal performance and insightful analytics for your network infrastructure.</p>]]></content><author><name>Andi</name></author><category term="New Relic" /><category term="Tutorial" /><category term="sticky" /><category term="featured" /><summary type="html"><![CDATA[This guide provides a comprehensive step-by-step setup for monitoring network data using New Relic, leveraging Docker containers and simulation tools. It outlines the configuration process for SNMP and network flow monitoring, ensuring a robust framework for data analysis and infrastructure management.]]></summary><media:thumbnail xmlns:media="http://search.yahoo.com/mrss/" url="https://andi.sg/assets/images/netflow.jpg" /><media:content medium="image" url="https://andi.sg/assets/images/netflow.jpg" xmlns:media="http://search.yahoo.com/mrss/" /></entry><entry><title type="html">Customize &amp;amp; Schedule and Your Report with New Relic Reporting</title><link href="https://andi.sg/customize-and-schedule-your-report/" rel="alternate" type="text/html" title="Customize &amp;amp; Schedule and Your Report with New Relic Reporting" /><published>2025-02-01T00:00:00+00:00</published><updated>2025-02-01T00:00:00+00:00</updated><id>https://andi.sg/customize-and-schedule-your-report</id><content type="html" xml:base="https://andi.sg/customize-and-schedule-your-report/"><![CDATA[<p>New Relic Reports is a report generation and automation framework for New Relic.</p>

<h3 id="report-generation">Report Generation</h3>

<p>The New Relic Reports engine provides support for generating reports in several ways.</p>

<p>Template Reports</p>

<p>Template reports provide a mechanism for building custom reports using templates. Templates are text-based, user-defined documents that can contain both content and logic. Templates are processed when a template report is run to produce text-based output. Special bits of logic called extensions are provided that make it easy to use New Relic data in template reports. By default, the output is rendered in a browser to produce PDF output, but it is just as easy to disable rendering and deliver the template output in a variety of ways.</p>

<p>Dashboard Reports</p>

<p>Dashboard reports use Nerdgraph to collect snapshot URLs from one or more user specified dashboard GUIDs. Snapshot URLs are downloaded as PDFs. When more than one dashboard is specified, the PDFs can optionally be concatenated into a single PDF.</p>

<p>Query Reports</p>

<p>Query reports provide a mechanism to export the results of running a NRQL query by simply specifying a query and one or more account IDs to run the query against. No additional configuration is required. By default, query results are exported to CSV but can also be exported as HTML or JSON.</p>

<h3 id="report-delivery">Report Delivery</h3>

<p>A variety of mechanisms are supported for delivering report output. These mechanisms are referred to as channels. The following types of channels are supported.</p>

<ul>
  <li>File: Report output is saved to a file and copied to a destination directory on the local filesystem. Mostly meant for development and testing purposes.</li>
  <li>Email: Report output is included inline or as attachments to an email using a user defined email template and sent via SMTP.</li>
  <li>S3: Report output is saved to a file and uploaded to an S3 bucket.</li>
  <li>Slack: Report output is posted to a Slack channel via a Slack webhook.</li>
  <li>Webhook: Report output is posted to a custom Webhook.</li>
</ul>

<h3 id="running-reports">Running Reports</h3>

<p>There are several ways to run reports using the reporting engine.</p>

<ul>
  <li>Packaged as a Docker image</li>
  <li>Packaged as an AWS Lambda function</li>
  <li>Using the command line interface (CLI)</li>
</ul>

<p>You can find the documentation here : https://github.com/newrelic/nr-reports</p>

<h3 id="example-exporting-infrastructure-data-into-csv">Example: Exporting Infrastructure Data  into CSV</h3>

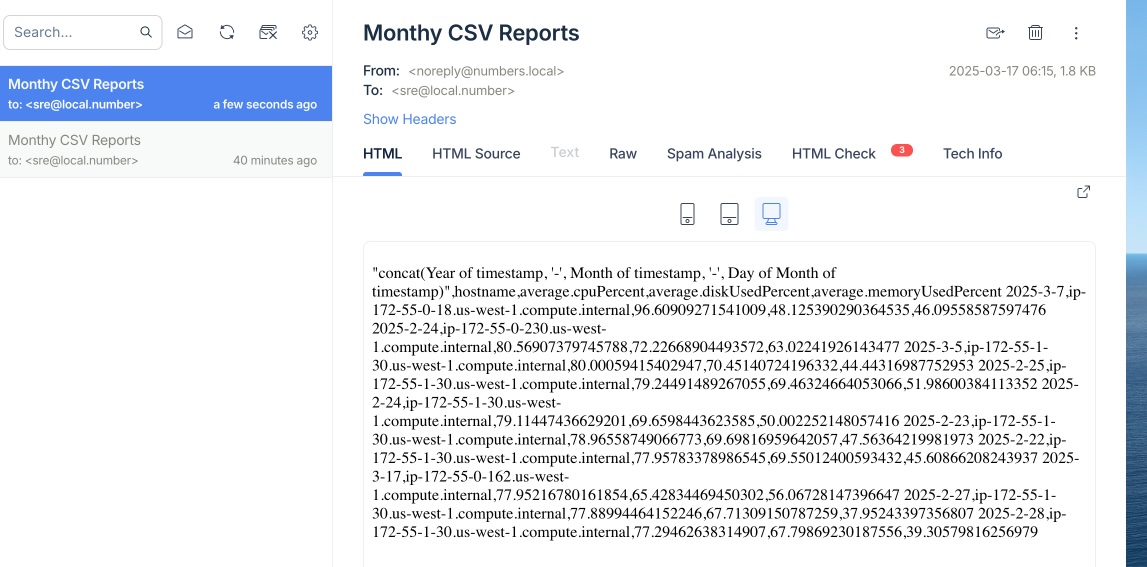
<p>The following example is exporting infrastructure information such as average CPU percentage, average memory consumption, and average disk used percentage. The process will produce a csv file in a /shared directory.</p>

<ul>
  <li>Clone New Relic Report Repository</li>
</ul>

<div class="language-shell highlighter-rouge"><div class="highlight"><pre class="highlight"><code>git clone https://github.com/newrelic/nr-reports.git
</code></pre></div></div>

<ul>
  <li>Create a configuration file in  include/manifest.json</li>
</ul>

<div class="language-json highlighter-rouge"><div class="highlight"><pre class="highlight"><code><span class="nl">"reports"</span><span class="p">:</span><span class="w"> </span><span class="p">[</span><span class="w">
    </span><span class="p">{</span><span class="w">
      </span><span class="nl">"id"</span><span class="p">:</span><span class="w"> </span><span class="s2">"monthly-report-infrastructure-csv"</span><span class="p">,</span><span class="w">
      </span><span class="nl">"name"</span><span class="p">:</span><span class="w"> </span><span class="s2">"Monthy Report Infrastructure Application Export"</span><span class="p">,</span><span class="w">
      </span><span class="nl">"query"</span><span class="p">:</span><span class="w"> </span><span class="s2">"FROM SystemSample SELECT average(cpuPercent), average(memoryUsedPercent), average(diskUsedPercent)  FACET CONCAT(yearOf(timestamp),'-', monthOf(timestamp, numeric), '-', dayOfMonthOf(timestamp) ),  hostname SINCE 30 days ago "</span><span class="p">,</span><span class="w">
      </span><span class="nl">"accountIds"</span><span class="p">:</span><span class="w"> </span><span class="p">[</span><span class="mi">412</span><span class="err">XXXX</span><span class="p">],</span><span class="w">
      </span><span class="nl">"publishConfigs"</span><span class="p">:</span><span class="w"> </span><span class="p">[</span><span class="w">
        </span><span class="p">{</span><span class="w">
          </span><span class="nl">"id"</span><span class="p">:</span><span class="w"> </span><span class="s2">"email-report-to-team-lead"</span><span class="p">,</span><span class="w">
          </span><span class="nl">"name"</span><span class="p">:</span><span class="w"> </span><span class="s2">"Email Monthy Report Infrastructure Application Export"</span><span class="p">,</span><span class="w">
          </span><span class="nl">"enabled"</span><span class="p">:</span><span class="w"> </span><span class="kc">true</span><span class="p">,</span><span class="w">
          </span><span class="nl">"channels"</span><span class="p">:</span><span class="w"> </span><span class="p">[</span><span class="w">
            </span><span class="p">{</span><span class="w">
              </span><span class="nl">"id"</span><span class="p">:</span><span class="w"> </span><span class="s2">"send-email"</span><span class="p">,</span><span class="w">
              </span><span class="nl">"name"</span><span class="p">:</span><span class="w"> </span><span class="s2">"Email CSV report to leadership"</span><span class="p">,</span><span class="w">
              </span><span class="nl">"type"</span><span class="p">:</span><span class="w"> </span><span class="s2">"email"</span><span class="p">,</span><span class="w">
              </span><span class="nl">"subject"</span><span class="p">:</span><span class="w"> </span><span class="s2">"Monthy CSV Reports"</span><span class="p">,</span><span class="w">
              </span><span class="nl">"from"</span><span class="p">:</span><span class="w"> </span><span class="s2">"noreply@numbers.local"</span><span class="p">,</span><span class="w">
              </span><span class="nl">"to"</span><span class="p">:</span><span class="w"> </span><span class="s2">"sre@local.number"</span><span class="w">            
            </span><span class="p">}</span><span class="w">
          </span><span class="p">]</span><span class="w">
        </span><span class="p">},</span><span class="w">
        </span><span class="p">{</span><span class="w">
          </span><span class="nl">"id"</span><span class="p">:</span><span class="w"> </span><span class="s2">"copy-file-to-share-folder"</span><span class="p">,</span><span class="w">
          </span><span class="nl">"name"</span><span class="p">:</span><span class="w"> </span><span class="s2">"Copy file to shared folder"</span><span class="p">,</span><span class="w">
        </span><span class="nl">"enabled"</span><span class="p">:</span><span class="w"> </span><span class="kc">true</span><span class="p">,</span><span class="w">
          </span><span class="nl">"file"</span><span class="p">:</span><span class="w"> </span><span class="s2">"file"</span><span class="p">,</span><span class="w">
          </span><span class="nl">"destDir"</span><span class="p">:</span><span class="w"> </span><span class="s2">"../shared"</span><span class="w">
        </span><span class="p">}</span><span class="w">
      </span><span class="p">]</span><span class="w">
    </span><span class="p">}</span><span class="w">
  </span><span class="p">]</span><span class="w">
</span></code></pre></div></div>

<ul>
  <li>Provide New Relic User Key</li>
</ul>

<div class="language-shell highlighter-rouge"><div class="highlight"><pre class="highlight"><code><span class="nb">export </span><span class="nv">NEWRELIC_API_KEY</span><span class="o">=</span>NRAK-XXXXCWWVDELIESQ5HOXXXXXXXX  Running Report using CLI to send it via email  
</code></pre></div></div>

<ul>
  <li>Running Report using CLI to export to file</li>
</ul>

<pre><code class="language-csv">2025-3-7,ip-172-55-0-18.us-west-1.compute.internal,96.60909271541009,48.125390290364535,46.09558587597476
2025-2-24,ip-172-55-0-230.us-west-1.compute.internal,80.56907379745788,72.22668904493572,63.02241926143477
2025-3-5,ip-172-55-1-30.us-west-1.compute.internal,80.00059415402947,70.45140724196332,44.44316987752953
2025-2-25,ip-172-55-1-30.us-west-1.compute.internal,79.24491489267055,69.46324664053066,51.986003841133524
2025-2-24,ip-172-55-1-30.us-west-1.compute.internal,79.11447436629201,69.6598443623585,50.00225214805742
2025-2-23,ip-172-55-1-30.us-west-1.compute.internal,78.96558749066773,69.69816959642057,47.56364219981973
2025-2-22,ip-172-55-1-30.us-west-1.compute.internal,77.95783378986545,69.55012400593432,45.60866208243937
2025-3-17,ip-172-55-0-162.us-west-1.compute.internal,77.95216780161854,65.42834469450302,56.06728147396647
2025-2-27,ip-172-55-1-30.us-west-1.compute.internal,77.88994464152246,67.71309150787259,37.95243397356807
2025-2-28,ip-172-55-1-30.us-west-1.compute.internal,77.29462638314907,67.79869230187556,39.30579816256979
</code></pre>

<ol>
  <li>Running Report using CLI to send it via email</li>
</ol>

<div class="language-shell highlighter-rouge"><div class="highlight"><pre class="highlight"><code>sh nr-reports-cli/bin/nr-reports.sh <span class="nt">-f</span> include/manifest.json <span class="nt">-u</span> email-report-to-team-lead
</code></pre></div></div>

<p>Sample Output <img src="/assets/images/nr-report-csv.jpg" alt="CSV Email Output" /></p>]]></content><author><name>Andi</name></author><category term="New Relic" /><category term="Tutorial" /><category term="featured" /><summary type="html"><![CDATA[New Relic Reports is a report generation and automation framework for New Relic.]]></summary><media:thumbnail xmlns:media="http://search.yahoo.com/mrss/" url="https://andi.sg/assets/images/nr-report-csv.jpg" /><media:content medium="image" url="https://andi.sg/assets/images/nr-report-csv.jpg" xmlns:media="http://search.yahoo.com/mrss/" /></entry><entry><title type="html">Welcome to Jekyll!</title><link href="https://andi.sg/welcome-to-jekyll/" rel="alternate" type="text/html" title="Welcome to Jekyll!" /><published>2024-02-04T00:00:00+00:00</published><updated>2024-02-04T00:00:00+00:00</updated><id>https://andi.sg/welcome-to-jekyll</id><content type="html" xml:base="https://andi.sg/welcome-to-jekyll/"><![CDATA[<p>You’ll find this post in your <code class="language-plaintext highlighter-rouge">_posts</code> directory. Go ahead and edit it and re-build the site to see your changes. You can rebuild the site in many different ways, but the most common way is to run <code class="language-plaintext highlighter-rouge">jekyll serve</code>, which launches a web server and auto-regenerates your site when a file is updated.</p>

<p>To add new posts, simply add a file in the <code class="language-plaintext highlighter-rouge">_posts</code> directory that follows the convention <code class="language-plaintext highlighter-rouge">YYYY-MM-DD-name-of-post.ext</code> and includes the necessary front matter. Take a look at the source for this post to get an idea about how it works.</p>

<p>Jekyll also offers powerful support for code snippets:</p>

<figure class="highlight"><pre><code class="language-ruby" data-lang="ruby"><span class="k">def</span> <span class="nf">print_hi</span><span class="p">(</span><span class="nb">name</span><span class="p">)</span>
  <span class="nb">puts</span> <span class="s2">"Hi, </span><span class="si">#{</span><span class="nb">name</span><span class="si">}</span><span class="s2">"</span>
<span class="k">end</span>
<span class="n">print_hi</span><span class="p">(</span><span class="s1">'Tom'</span><span class="p">)</span>
<span class="c1">#=&gt; prints 'Hi, Tom' to STDOUT.</span></code></pre></figure>

<p>Check out the <a href="https://jekyllrb.com/docs/home">Jekyll docs</a> for more info on how to get the most out of Jekyll. File all bugs/feature requests at <a href="https://github.com/jekyll/jekyll">Jekyll’s GitHub repo</a>. If you have questions, you can ask them on <a href="https://talk.jekyllrb.com/">Jekyll Talk</a>.</p>]]></content><author><name>andi</name></author><category term="Jekyll" /><summary type="html"><![CDATA[You’ll find this post in your _posts directory. Go ahead and edit it and re-build the site to see your changes. You can rebuild the site in many different ways, but the most common way is to run jekyll serve, which launches a web server and auto-regenerates your site when a file is updated.]]></summary><media:thumbnail xmlns:media="http://search.yahoo.com/mrss/" url="https://andi.sg/assets/images/demo1.jpg" /><media:content medium="image" url="https://andi.sg/assets/images/demo1.jpg" xmlns:media="http://search.yahoo.com/mrss/" /></entry><entry><title type="html">About Bundler</title><link href="https://andi.sg/about-bundler/" rel="alternate" type="text/html" title="About Bundler" /><published>2024-01-29T00:00:00+00:00</published><updated>2024-01-29T00:00:00+00:00</updated><id>https://andi.sg/about-bundler</id><content type="html" xml:base="https://andi.sg/about-bundler/"><![CDATA[<p><code class="language-plaintext highlighter-rouge">gem install bundler</code> installs the bundler gem through RubyGems. You only need to install it once - not every time you create a new Jekyll project. Here are some additional details:</p>

<p><code class="language-plaintext highlighter-rouge">bundler</code> is a gem that manages other Ruby gems. It makes sure your gems and gem versions are compatible, and that you have all necessary dependencies each gem requires.</p>

<p>The <code class="language-plaintext highlighter-rouge">Gemfile</code> and <code class="language-plaintext highlighter-rouge">Gemfile.lock</code> files inform <code class="language-plaintext highlighter-rouge">Bundler</code> about the gem requirements in your site. If your site doesn’t have these Gemfiles, you can omit <code class="language-plaintext highlighter-rouge">bundle exec</code> and just <code class="language-plaintext highlighter-rouge">run jekyll serve</code>.</p>

<p>When you run <code class="language-plaintext highlighter-rouge">bundle exec jekyll serve</code>, <code class="language-plaintext highlighter-rouge">Bundler</code> uses the gems and versions as specified in <code class="language-plaintext highlighter-rouge">Gemfile.lock</code> to ensure your Jekyll site builds with no compatibility or dependency conflicts.</p>

<p>For more information about how to use <code class="language-plaintext highlighter-rouge">Bundler</code> in your Jekyll project, this tutorial should provide answers to the most common questions and explain how to get up and running quickly.</p>]]></content><author><name>sal</name></author><category term="Jekyll" /><summary type="html"><![CDATA[gem install bundler installs the bundler gem through RubyGems. You only need to install it once - not every time you create a new Jekyll project. Here are some additional details:]]></summary><media:thumbnail xmlns:media="http://search.yahoo.com/mrss/" url="https://andi.sg/assets/images/burger01.jpg" /><media:content medium="image" url="https://andi.sg/assets/images/burger01.jpg" xmlns:media="http://search.yahoo.com/mrss/" /></entry><entry><title type="html">Powerful things you can do with the Markdown editor</title><link href="https://andi.sg/powerful-things-markdown-editor/" rel="alternate" type="text/html" title="Powerful things you can do with the Markdown editor" /><published>2024-01-24T00:00:00+00:00</published><updated>2024-01-24T00:00:00+00:00</updated><id>https://andi.sg/powerful-things-markdown-editor</id><content type="html" xml:base="https://andi.sg/powerful-things-markdown-editor/"><![CDATA[<p>There are lots of powerful things you can do with the Markdown editor</p>

<p>If you’ve gotten pretty comfortable with writing in Markdown, then you may enjoy some more advanced tips about the types of things you can do with Markdown!</p>

<p>As with the last post about the editor, you’ll want to be actually editing this post as you read it so that you can see all the Markdown code we’re using.</p>

<h2 id="special-formatting">Special formatting</h2>

<p>As well as bold and italics, you can also use some other special formatting in Markdown when the need arises, for example:</p>

<ul>
  <li><del>strike through</del></li>
  <li>==highlight==</li>
  <li>*escaped characters*</li>
</ul>

<h2 id="writing-code-blocks">Writing code blocks</h2>

<p>There are two types of code elements which can be inserted in Markdown, the first is inline, and the other is block. Inline code is formatted by wrapping any word or words in back-ticks, <code class="language-plaintext highlighter-rouge">like this</code>. Larger snippets of code can be displayed across multiple lines using triple back ticks:</p>

<div class="language-plaintext highlighter-rouge"><div class="highlight"><pre class="highlight"><code>.my-link {
    text-decoration: underline;
}
</code></pre></div></div>

<p>If you want to get really fancy, you can even add syntax highlighting using Rouge.</p>

<p><img src="/assets/images/3.jpg" alt="walking" /></p>

<h2 id="reference-lists">Reference lists</h2>

<p>The quick brown jumped over the lazy.</p>

<p>Another way to insert links in markdown is using reference lists. You might want to use this style of linking to cite reference material in a Wikipedia-style. All of the links are listed at the end of the document, so you can maintain full separation between content and its source or reference.</p>

<h2 id="full-html">Full HTML</h2>

<p>Perhaps the best part of Markdown is that you’re never limited to just Markdown. You can write HTML directly in the Markdown editor and it will just work as HTML usually does. No limits! Here’s a standard YouTube embed code as an example:</p>

<p><iframe style="width:100%;" height="315" src="https://www.youtube.com/embed/Cniqsc9QfDo?rel=0&amp;showinfo=0" frameborder="0" allowfullscreen=""></iframe></p>]]></content><author><name>sal</name></author><category term="Jekyll" /><category term="tutorial" /><category term="featured" /><summary type="html"><![CDATA[There are lots of powerful things you can do with the Markdown editor]]></summary><media:thumbnail xmlns:media="http://search.yahoo.com/mrss/" url="https://andi.sg/assets/images/golden-gate01.jpg" /><media:content medium="image" url="https://andi.sg/assets/images/golden-gate01.jpg" xmlns:media="http://search.yahoo.com/mrss/" /></entry><entry><title type="html">Options for creating a new site with Jekyll</title><link href="https://andi.sg/options-for-creating-new-site-with-jekyll/" rel="alternate" type="text/html" title="Options for creating a new site with Jekyll" /><published>2024-01-23T00:00:00+00:00</published><updated>2024-01-23T00:00:00+00:00</updated><id>https://andi.sg/options-for-creating-new-site-with-jekyll</id><content type="html" xml:base="https://andi.sg/options-for-creating-new-site-with-jekyll/"><![CDATA[<p><code class="language-plaintext highlighter-rouge">jekyll new &lt;PATH&gt;</code> installs a new Jekyll site at the path specified (relative to current directory). In this case, Jekyll will be installed in a directory called <code class="language-plaintext highlighter-rouge">myblog</code>. Here are some additional details:</p>

<ul>
  <li>To install the Jekyll site into the directory you’re currently in, run <code class="language-plaintext highlighter-rouge">jekyll new</code> . If the existing directory isn’t empty, you can pass the –force option with jekyll new . –force.</li>
  <li><code class="language-plaintext highlighter-rouge">jekyll new</code> automatically initiates <code class="language-plaintext highlighter-rouge">bundle install</code> to install the dependencies required. (If you don’t want Bundler to install the gems, use <code class="language-plaintext highlighter-rouge">jekyll new myblog --skip-bundle</code>.)</li>
  <li>By default, the Jekyll site installed by <code class="language-plaintext highlighter-rouge">jekyll new</code> uses a gem-based theme called Minima. With gem-based themes, some of the directories and files are stored in the theme-gem, hidden from your immediate view.</li>
  <li>We recommend setting up Jekyll with a gem-based theme but if you want to start with a blank slate, use <code class="language-plaintext highlighter-rouge">jekyll new myblog --blank</code></li>
  <li>To learn about other parameters you can include with <code class="language-plaintext highlighter-rouge">jekyll new</code>, type <code class="language-plaintext highlighter-rouge">jekyll new --help</code>.</li>
</ul>]]></content><author><name>jane</name></author><category term="Jekyll" /><category term="tutorial" /><summary type="html"><![CDATA[jekyll new &lt;PATH&gt; installs a new Jekyll site at the path specified (relative to current directory). In this case, Jekyll will be installed in a directory called myblog. Here are some additional details:]]></summary><media:thumbnail xmlns:media="http://search.yahoo.com/mrss/" url="https://andi.sg/assets/images/book01.jpg" /><media:content medium="image" url="https://andi.sg/assets/images/book01.jpg" xmlns:media="http://search.yahoo.com/mrss/" /></entry><entry><title type="html">Quick Start Guide</title><link href="https://andi.sg/quick-start-guide/" rel="alternate" type="text/html" title="Quick Start Guide" /><published>2024-01-20T00:00:00+00:00</published><updated>2024-01-20T00:00:00+00:00</updated><id>https://andi.sg/quick-start-guide</id><content type="html" xml:base="https://andi.sg/quick-start-guide/"><![CDATA[<p>If you already have a full Ruby development environment with all headers and RubyGems installed (see Jekyll’s requirements), you can create a new Jekyll site by doing the following:</p>

<div class="language-ruby highlighter-rouge"><div class="highlight"><pre class="highlight"><code><span class="c1"># Install Jekyll and Bundler gems through RubyGems</span>
<span class="n">gem</span> <span class="n">install</span> <span class="n">jekyll</span> <span class="n">bundler</span>

<span class="c1"># Create a new Jekyll site at ./myblog</span>
<span class="n">jekyll</span> <span class="n">new</span> <span class="n">myblog</span>

<span class="c1"># Change into your new directory</span>
<span class="n">cd</span> <span class="n">myblog</span>

<span class="c1"># Build the site on the preview server</span>
<span class="n">bundle</span> <span class="nb">exec</span> <span class="n">jekyll</span> <span class="n">serve</span>

<span class="c1"># Now browse to http://localhost:4000</span>
</code></pre></div></div>]]></content><author><name>sal</name></author><category term="Jekyll" /><category term="tutorial" /><summary type="html"><![CDATA[If you already have a full Ruby development environment with all headers and RubyGems installed (see Jekyll’s requirements), you can create a new Jekyll site by doing the following:]]></summary><media:thumbnail xmlns:media="http://search.yahoo.com/mrss/" url="https://andi.sg/assets/images/potrait01.jpg" /><media:content medium="image" url="https://andi.sg/assets/images/potrait01.jpg" xmlns:media="http://search.yahoo.com/mrss/" /></entry><entry><title type="html">Markdown Example</title><link href="https://andi.sg/markup-example/" rel="alternate" type="text/html" title="Markdown Example" /><published>2024-01-19T00:00:00+00:00</published><updated>2024-01-19T00:00:00+00:00</updated><id>https://andi.sg/markup-example</id><content type="html" xml:base="https://andi.sg/markup-example/"><![CDATA[<p>You’ll find this post in your <code class="language-plaintext highlighter-rouge">_posts</code> directory. Go ahead and edit it and re-build the site to see your changes. You can rebuild the site in many different ways, but the most common way is to run <code class="language-plaintext highlighter-rouge">jekyll serve</code>, which launches a web server and auto-regenerates your site when a file is updated. Something.</p>

<p>To add new posts, simply add a file in the <code class="language-plaintext highlighter-rouge">_posts</code> directory that follows the convention <code class="language-plaintext highlighter-rouge">YYYY-MM-DD-name-of-post.ext</code> and includes the necessary front matter. Take a look at the source for this post to get an idea about how it works.</p>

<p>Jekyll also offers powerful support for code snippets:</p>

<figure class="highlight"><pre><code class="language-ruby" data-lang="ruby"><span class="k">def</span> <span class="nf">print_hi</span><span class="p">(</span><span class="nb">name</span><span class="p">)</span>
  <span class="nb">puts</span> <span class="s2">"Hi, </span><span class="si">#{</span><span class="nb">name</span><span class="si">}</span><span class="s2">"</span>
<span class="k">end</span>
<span class="n">print_hi</span><span class="p">(</span><span class="s1">'Tom'</span><span class="p">)</span>
<span class="c1">#=&gt; prints 'Hi, Tom' to STDOUT.</span></code></pre></figure>

<p>Check out the <a href="http://jekyllrb.com/docs/home">Jekyll docs</a> for more info on how to get the most out of Jekyll. File all bugs/feature requests at <a href="https://github.com/jekyll/jekyll">Jekyll’s GitHub repo</a>. If you have questions, you can ask them on <a href="https://talk.jekyllrb.com/">Jekyll Talk</a>.</p>]]></content><author><name>jane</name></author><category term="Jekyll" /><category term="tutorial" /><category term="featured" /><summary type="html"><![CDATA[You’ll find this post in your _posts directory. Go ahead and edit it and re-build the site to see your changes. You can rebuild the site in many different ways, but the most common way is to run jekyll serve, which launches a web server and auto-regenerates your site when a file is updated. Something.]]></summary><media:thumbnail xmlns:media="http://search.yahoo.com/mrss/" url="https://andi.sg/assets/images/ice-coffee01.jpg" /><media:content medium="image" url="https://andi.sg/assets/images/ice-coffee01.jpg" xmlns:media="http://search.yahoo.com/mrss/" /></entry></feed>